 |
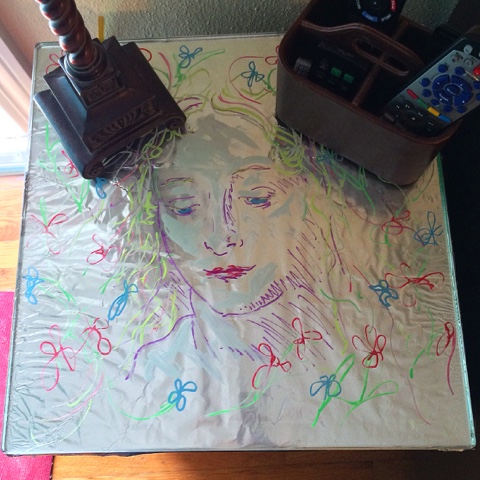
| liquid chalk marker doodle under glass |
We've been moving things around lately and now have a brown couch, brown end table & brown lamp all together - blech. I've been meaning to paint the lamp forever anyway (next project) and might do the same with the table. But in the meantime I ordered a beveled glass top with plans to put some colorful papers and antique postcards underneath.
 |
| table top before - way too much brown |
The glass arrived while I was playing with these colorful Liquid Chalk Markers. The Ander Blake Company sent me this set in exchange for an unbiased review, which I shared in yesterday's post. If you are curious, click here to check it out and see a couple of projects The Dude came up with.

Since I already had the markers out, and anything I made could be easily erased, I thought it might be fun to do a bit of reverse glass doodling. Years ago I worked in an antique shop that had many old reverse glass paintings in all states of decay. It is a fascinating technique (and way more complicated than my scribblings.)

This print of Leonardo DaVinci's Study of a Face was propped up in the corner and seemed like the perfect muse. The glass was placed face (beveled side) down and cleaned with a swipe of windex.

With these vibrant colors, I decided to skip the realism and just have fun with a fast doodle-tracing, very free form. I wanted a thicker smear with the white so just rubbed it with my finger before it dried. Liquid chalk dries quickly, making this a light and speedy project. If I'd needed to erase anything, a rub with paper towel would have taken care of it. Once the face was done the edges were too empty, so I threw down some loose flowery scribbles.

Two things to keep in mind when you are working with reverse glass. (1) Your final piece will be viewed as the mirror image of what you are tracing. (2) If you build up layers of chalk, the first marks made will in the foreground, with marks you paint on top of it appearing behind. I know both of these tips are obvious - just something to keep in mind as you play.

This is a super fast project, maybe 10-20 minutes. I still didn't want to see brown table top through the clear parts, though. Since this is a temporary decoration, I topped the wood with a couple of pieces of tin foil. The glass was flipped over so the bevel side faced up. With the chalk side underneath, the image is safe from scratches or sweating lemonade glasses.

A few What Ifs - If the glass were going directly on the wood, I'd have added some clear rubber feet to raise it up a smidge. While the chalk is dry, I don't know if it could still get trapped in the wood grain or not. If you don't like the tinfoil wrinkles sandwich some pretty fabric, paper or a mirror between the glass and table. If this was a design you wanted to keep, I'd suggest using a more permanent paint or paint pen instead of chalk and then spraying the back layer with Krylon Looking Glass Paint.
And if do you decide to play with foil, just trim or fold over the edges. Unlike my lazy self (see next photo).

Like I mentioned earlier, this is a super-fast, super-easy project and a fun way to change things up on a whim. The markers have a clean bevel tip for making smooth thin or thick lines on a nonporous surface. The liquid chalk applies fluidly, dries quickly and is easily removed with a paper towel (& if necessary a bit of windex).
If you have any thoughts or questions, please share. I love feedback.
For more info on these Liquid Chalk Markers visit:
The Ander Blake Company Facebook page and Website.
Click here to find them on Amazon (not an affiliate link). To sweeten the deal, they have a 100% Money Back Guarantee.


No comments:
Post a Comment